History
This section explains the functionalities of the history of Journeys. It is essential for monitoring and tracking journey execution history over a specific period.
✅ Pre-requisites
- Basic understanding of Quickwork terminologies and familiarity with the Quickwork's GUI.
- Experience in creating, executing and managing a Journey effectively from start to finish.
Viewing & using the History tab
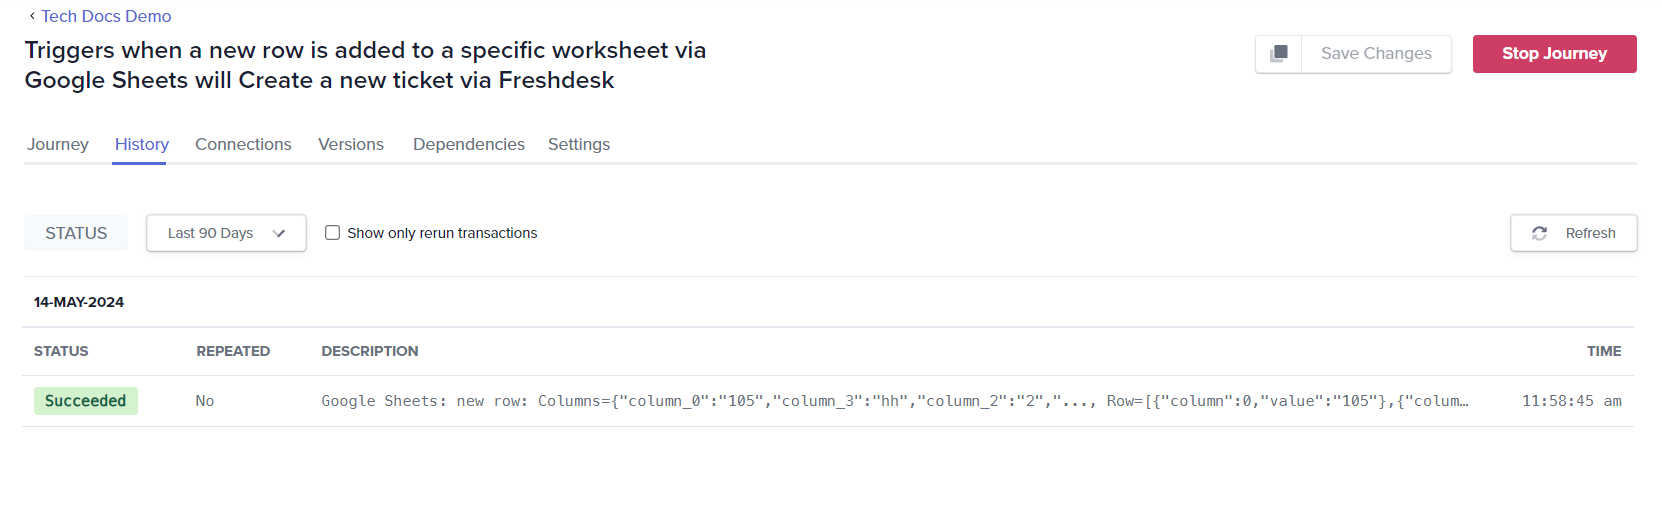
Once you create the Journey and click Save & Start, it is saved and ready to accept trigger events, and you are redirected to the History tab.

By default, the History tab displays the transaction (Journey execution) history for the past three months.
-
If you have activated a trigger and need to update the displayed information, click on Refresh. This is useful if the transaction hasn't appeared after Journey execution or if the Journey is in the Pending state. Each entry includes a Status, Repeated, and Description.
-
Status: Indicates the outcome of each transaction. It can be Succeeded, Failure, Pending, or Initializing, describing whether the Journey was completed successfully, encountered an error, or is still processing, respectively.
-
Repeated: Shows whether the transaction was a Rerun of a previous attempt. Yes indicates the transaction was retried, and No indicates it was a unique instance.
-
Description: Provides a brief summary of the transaction, often detailing the specific trigger and action taken.
The Initializing status of a transaction means the transaction has been accepted by Quickwork, but its execution has not started yet.
Viewing transaction reports
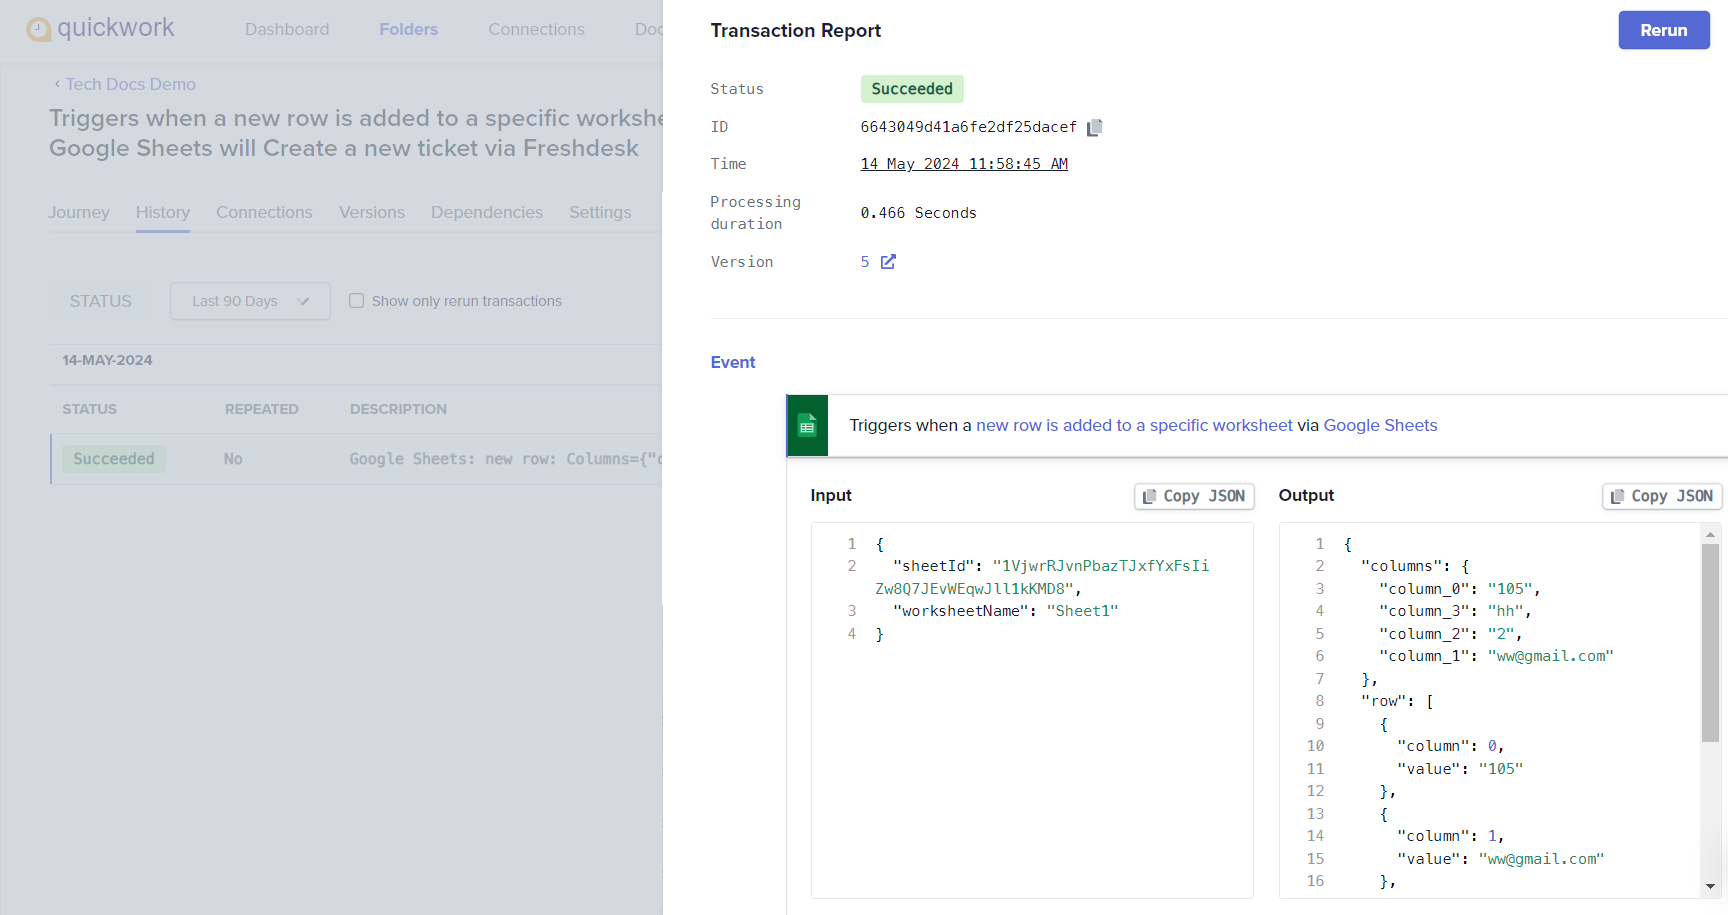
Click on any transaction to open the Transaction Report. This report includes detailed information such as:
- Status: Shows whether the Journey Succeeded, Failure, Pending, or Initializing.
- ID: Unique identifier for the Journey.
- Time: Timestamp of when the Journey was executed.
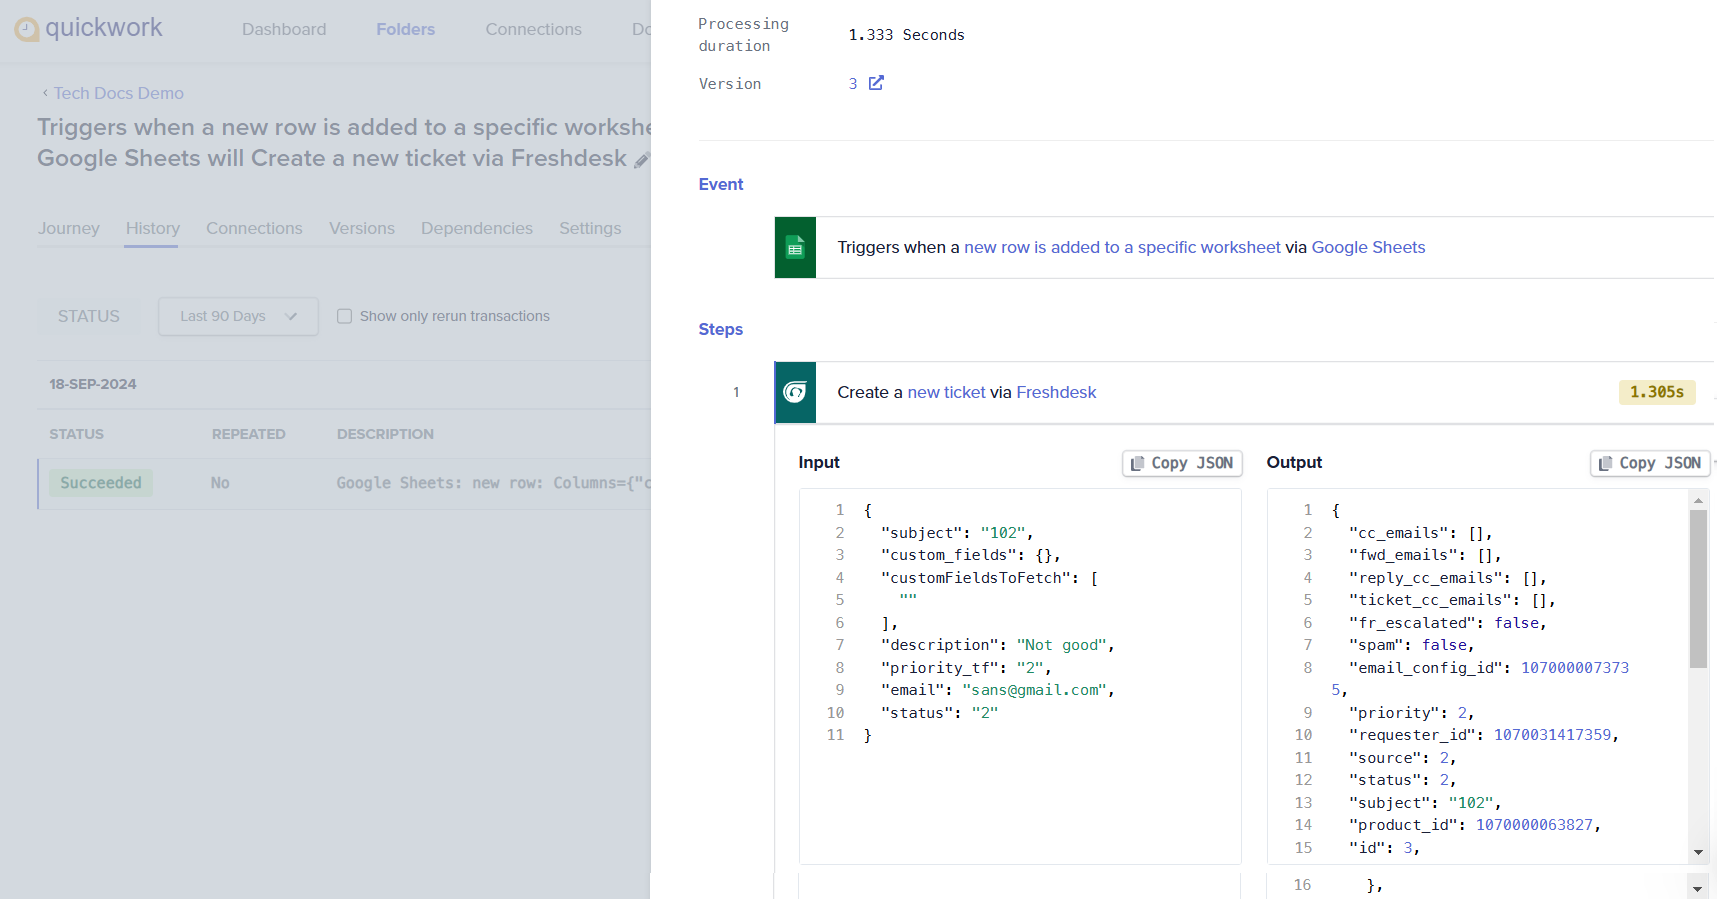
- Processing duration: Denotes the time the Journey took to execute in seconds.
- Version: Version ID is updated each time a modification is made and successfully saved to a Journey. Clicking on the arrow button will take you to the corresponding Journey version using which the current transaction was executed.
- Event: This trigger event includes Input and Output keys and values in JSON format related to a Journey's trigger event. It also displays the actual data being transferred from the connected app.
Click the Event statement to view the trigger data split into Input and Output tabs:
-
Input: Shows key-value pairs input during the Journey creation. For example, Google Sheets contains key-value pairs such as sheetId and worksheetName, specifying which worksheet the data is being retrieved from. This information serves as the initial input to the journey, triggering the subsequent actions based on the new row added to the specified worksheet.
-
Output: Contains JSON data structure representing the outcome of a triggered event. This data is then sent to the action used in the Journey. For example, columns and their respective values, which are captured from the new row added in Google Sheets. These output details are then utilized by subsequent actions within the Journey, such as creating a ticket in Freshdesk based on the fetched information.
-
- Steps: Click the Steps for action data, structured similarly to the trigger data. You can view the specific actions taken during a Journey.
-
Input: Displays the data input to execute an action. For instance, when creating a new ticket via Freshdesk, input data includes fields like subject, description, priority, email, and status populated with values derived from the trigger's output.
-
Output: Displays the result of the action taken, reflecting changes or responses from the connected app. For example, considering the example above, the output includes details such as priority, requester_id, and status, which confirm the ticket's creation and provide additional details like the ticket id and any email configurations used.
-
Rerunning the Journey
If required, you can rerun a Journey transaction. When rerun, the trigger event is processed through the Journey's actions once more. This functionality is especially helpful in the following scenarios:
- You have made changes to the Journey and need to test these modifications.
- An error was encountered in a Journey, which you have since corrected, and you now need to rerun the Journey to ensure it works properly.
To rerun a Journey, simply click the Rerun button. The Journey gets executed again with the same trigger event (same set of inputs), progressing through the actions as before. Additionally, a new ID is generated for this rerun on the History tab.

The original Journey execution that was rerun is labeled as Yes under Repeated, emphasizing the execution was repeated.
Each rerun is counted as a separate transaction.
Rerunning Journeys can lead to duplication as the trigger event is processed again through the entire Journey. It's important to verify and eliminate any duplications before rerunning.
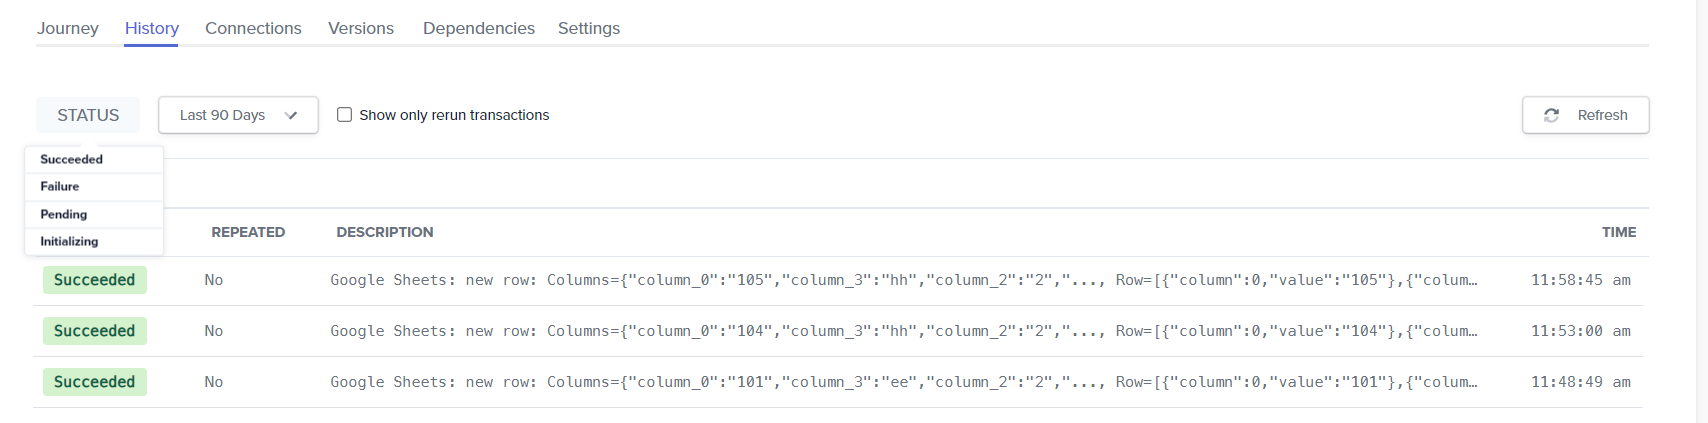
Filtering transactions
The STATUS drop-down allows you to filter transaction history based on the execution status of the Journeys. The options include:
- Succeeded: Displays only the transactions that were completed successfully.
- Failure: Shows transactions that did not complete successfully and encountered errors.
- Pending: Lists the transactions that are still in progress and have not yet reached a final status.
- Initializing: Lists all the transactions which are not yet under execution but will be scheduled soon for execution and will be moved to status Pending. Any transaction when it is first accepted by Quickwork first goes to Initializing status and when it is scheduled for execution it goes to Pending status which indicates that it is under execution.
Further filtering is possible by using the time interval drop-down (next to STATUS), allowing you to view transactions from the last hour, 12 hours, day, week, month, 90 days, or a custom range.
Additionally, there is a Show only rerun transactions checkbox to display only rerun transactions, making it easier to track repeated Journey executions.
With the filtering feature, you can quickly view and analyze the Journey executions over specific time frames and monitor trends or identify recurring issues easily and quickly.
Overview of transaction table
The Edit table option that is displayed on the History tab allows you to search transactions based on user-defined columns, which are populated according to their mapped fields from the executed transactions.
❓ Troubleshooting
- Managing polling triggers: For Journeys utilizing polling triggers in Quickwork, it's important to manage refresh intervals effectively. If you're using a polling trigger type, consider refreshing your transaction after a short gap.
- For failed transactions:
- Check API connectivity and ensure that the app APIs are operational and not experiencing downtime.
- Ensure that API credentials and endpoints are current and valid.
- If the schema or the input fields for an action are updated in the target app, then the user should refresh the Journey to update the input fields of the action to the latest fields.
- Ensure that network connections are verified, particularly when interacting with external services such as MySQL, PostgreSQL, and FTP. Confirm that these services are reachable from Quickwork servers and that the necessary IP whitelisting is completed.
- For pending transactions:
- Verify if there are delays or errors in responses from external APIs.
- Check the conditions in your decision-making processes. Make sure they are set correctly and not causing unnecessary delays.
- Steps of the Ask a question type, where the transaction is awaiting user input, will remain in a pending state until a user response is received.
- For actions such as Delay via Scheduler by Quickwork, the transaction will resume once the specified time has been reached.
- For repeated executions: Before rerunning a Journey, ensure that duplications are managed appropriately within the Journey to prevent data redundancy.
✏️ Tips and recommendations
- Review the History tab frequently to monitor Journey status and detect any patterns or recurrent issues.
- Configure alerts for failed transactions to promptly address any disruptions in Journey executions.
- Use the time interval filters to focus on recent activities or specific periods of interest for detailed analysis. Quickly isolate problematic Journeys by filtering for Failure or Pending statuses to prioritize troubleshooting efforts.
- Utilize the Rerun feature to test Journeys immediately after making changes or fixing a problem, ensuring that modifications are effective and error-free.
- If you are switching workspace, check your role permissions while checking history. For example, if you are a moderator, you might be restricted from rerunning or viewing detailed logs.
📚 Additional resources
Transactions in Journeys
Transaction tables
Building your first Journey
Journey management with history, connections, versions, dependencies, and sharing
Optimizing Journey performance
Analytics and reporting
Audit logs
Team