Data masking
This section explains the data masking feature in Quickwork.
When integrating core systems as part of the workflow orchestration process, handling confidential data securely is crucial. Quickwork ensures data security by adhering to various security standards and encryption mechanisms. However, in certain cases, it might be necessary to either store partial data or not store any data at all. Quickwork provides mechanisms to achieve this through data masking, custom history tables, and options to disable data storage entirely at the Journey level.
The data masking feature enables you to hide or mask data. You can disable the storage and display of input and output data at the step level, ensuring sensitive data, such as IDs, SSNs, passwords, and email addresses, are inaccessible to account admins during the Journey's execution. It guarantees that the data is never visible to the end-user, even if it is pending. Once a transaction is marked as successful or failed, all step data is instantly deleted from all storages, including backups, ensuring utmost confidentiality.
Sample scenarios where data masking is useful
- Financial transactions: Data masking hides sensitive information such as credit card numbers and CVV codes during online payment processing, ensuring that these details are not stored in the execution history, thus protecting customers’ financial data.
- Medical data: Data masking ensures that sensitive patient information, such as health records and appointment details, is not stored in the execution history during medical appointment scheduling, safeguarding patient privacy.
- Insurance claims processing: In insurance claims processing, data masking can protect sensitive customer information such as policy numbers, claim details, and personal health information. This ensures that this information is not stored in the execution history, safeguarding customer privacy and complying with regulatory requirements.
- E-commerce order processing: Data masking can hide customer order details such as payment information and shipping addresses during the order processing Journey. This ensures that these details are not stored in the execution history, protecting customer data from potential breaches.
For illustration purposes, consider a Journey that processes customer support tickets containing customers' email addresses in Google Sheets. The Journey will collect support ticket details and store them in a database. Data masking can be used to protect the customer email IDs.
Enabling data masking
To enable data masking:
-
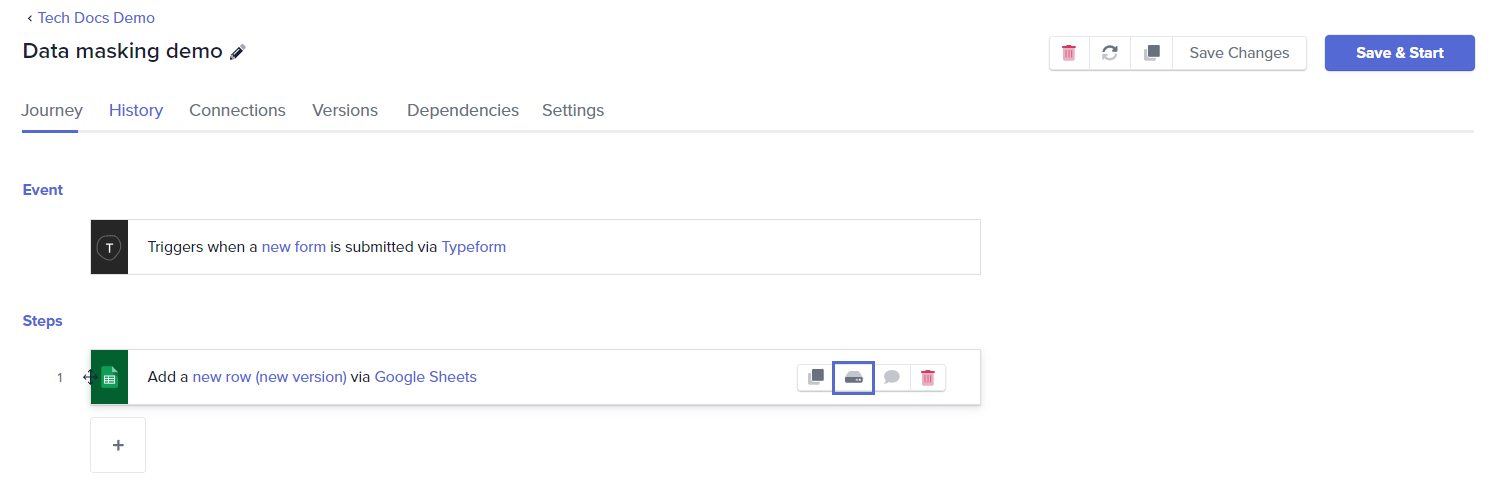
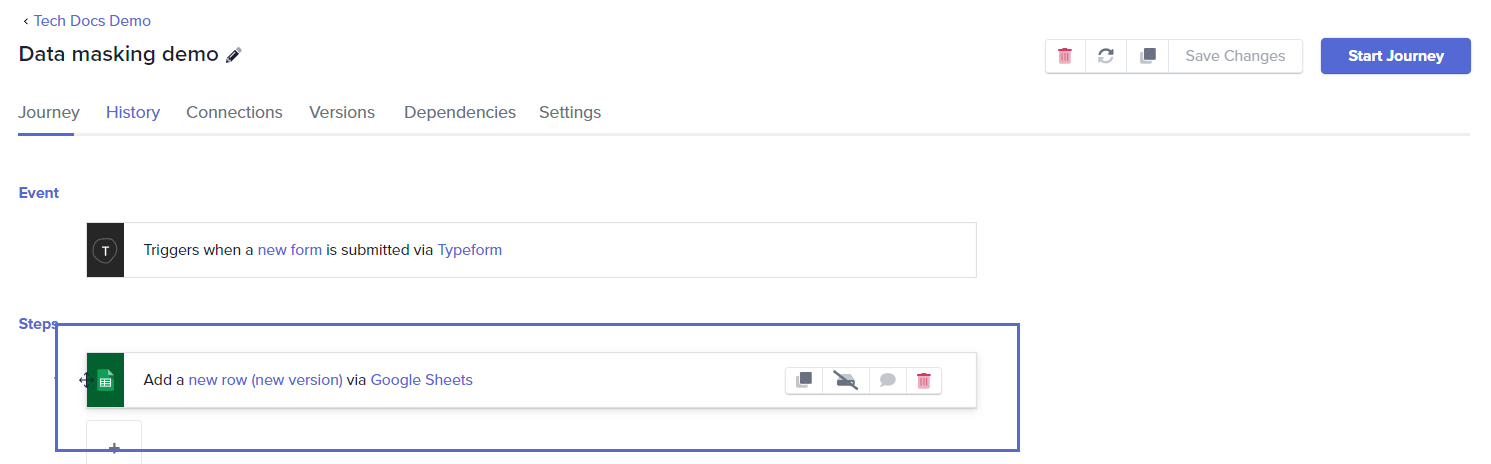
Navigate to the intended Journey. Locate the action step in which you want to mask data. In this case, adding a new row with customer details to Google Sheets is the step.
-
Click the data masking icon. This turns on the data masking feature. Here, the data in the step Add new row (new version) via Google Sheets is masked.
-
Click the Save Changes or Save & Start button, as required.
Testing if data is masked
Execute the Journey and open the History tab.
Refresh and click on any recent transaction.
The step’s input and output data are not displayed in the transaction report.

- The old transaction data remains unmasked and will continue to be displayed as originally recorded.
- All the data for all the steps in a Journey can be masked. However, the data for trigger events cannot be masked.
- Data masking can be enabled while creating the Journey or later by stopping the Journey first.
Disabling data masking
To disable data masking:
-
Go to the intended Journey and stop it.
-
Locate the action step in which you want to unmask data.
-
Click the data masking button (The tooltip says if data masking is ON or OFF). This turns off the data masking feature.
-
The input and output data for these steps will be visible again in the transaction report.

The data from earlier transactions when data masking was switched on, cannot be viewed even on disabling data masking.
It is also possible to mask data at Journey level instead of applying it to specific steps, allowing you to completely disable data storage across the entire Journey.
❓ Troubleshooting
- If you notice that data expected to be masked is still visible:
- Ensure that the data masking toggle is activated for the correct steps in the Journey.
- Verify that the Journey was saved and started after enabling data masking.
- Old transaction data remains unmasked and will continue to be displayed as originally recorded.
- Data masking should not affect the performance of the Journey by slowing it down. It might help increase the speed because the data is omitted for storage for the steps when data masking is turned on.
✏️ Tips and recommendations
- Apply data masking selectively to only those steps that handle sensitive data. Overuse can complicate troubleshooting.
- Use data masking to comply with data protection regulations and ensure sensitive information is not unnecessarily exposed within your operational tools.
- Periodically review and audit your Journeys to ensure that data masking settings are still relevant and correctly applied, especially after modifications to Journey configurations.
- Before implementing data masking in critical Journeys, test in a controlled environment to ensure that the Journey's functionality will not suffer unintended consequences.
- You can apply data masking for steps with large input or output sizes to improve the viewing speed of the Journey history. For example, when fetching 1000 rows from a database in a single step, as data is omitted for storage on Quickwork.
📚 Additional resources
Provisioned concurrency & Storage
Custom history tables or transaction tables
Error handling on Quickwork